
Most publishers have at least a vague sense that HTML5 is an important content technology, but what does that content actually look like? What can it do? The following excerpt from the free ebook “HTML5 for Publishers” shows how a simple finger painting canvas can be added to an HTML5-based book.
Doing animations on the HTML5 Canvas is cool, but what’s even cooler is letting the user draw on the Canvas herself. With the advent of
touchscreen phones, tablets, and ereaders, this becomes even more
compelling, as the user can draw directly on the screen with her finger,
rather than using a mouse or trackpad. In this section, we’ll look at how
to implement a simple “finger painting” app in the Canvas, which would be
a nice fit for a children’s ebook—for example, a story that lets kids draw
their own illustrations to accompany the text, or a preschool textbook
that uses the finger painting to teach colors and shapes.
Here’s the HTML we’ll use to construct the Finger Painting page; the
<canvas> tag which will hold the drawing area is
highlighted in bold:
<!doctype html>
<html lang="en">
<head>
<title>Finger Painting</title>
<script src="modernizr-1.6.min.js"></script>
<script src="finger_painting.js"></script>
</head>
<body>
<div>
<canvas id="canvas" width="500" height="500">
 Your browser does not support the HTML 5 Canvas.
</canvas>
</div>
<div>
<h1>Finger Painting</h1>
<p>Click/tap a color below to select a color, and then drag/swipe on the
  canvas above to draw a picture.</p>
<p>Color selected: <span id="color_chosen">Black</span></p>
<p>
<input type="button" id="Red" style="background-color: red; width: 25px;
height: 25px;"/>
<input type="button" id="Orange" style="background-color: orange; width: 25px;
height: 25px;"/>
<input type="button" id="Yellow" style="background-color: yellow; width: 25px;
height: 25px;"/>
<input type="button" id="Green" style="background-color: green; width: 25px;
height: 25px;"/>
<input type="button" id="Blue" style="background-color: blue; width: 25px;
height: 25px;"/>
<input type="button" id="Purple" style="background-color: purple; width: 25px;
height: 25px;"/>
<input type="button" id="Brown" style="background-color: brown; width: 25px;
height: 25px;"/>
<input type="button" id="Black" style="background-color: black; width: 25px;
height: 25px;"/>
<input type="button" id="White" style="background-color: white; width: 25px;
height: 25px;"/>
</p>
<p><input type="button" id="reset_image" value="Reset Drawing"/></p>
</div>
</body>
</html>
Note that the color palette below the Canvas has been implemented
using <input> buttons, which are styled with CSS
to be the appropriate color and size. The image below displays the page in Chrome for
Mac.
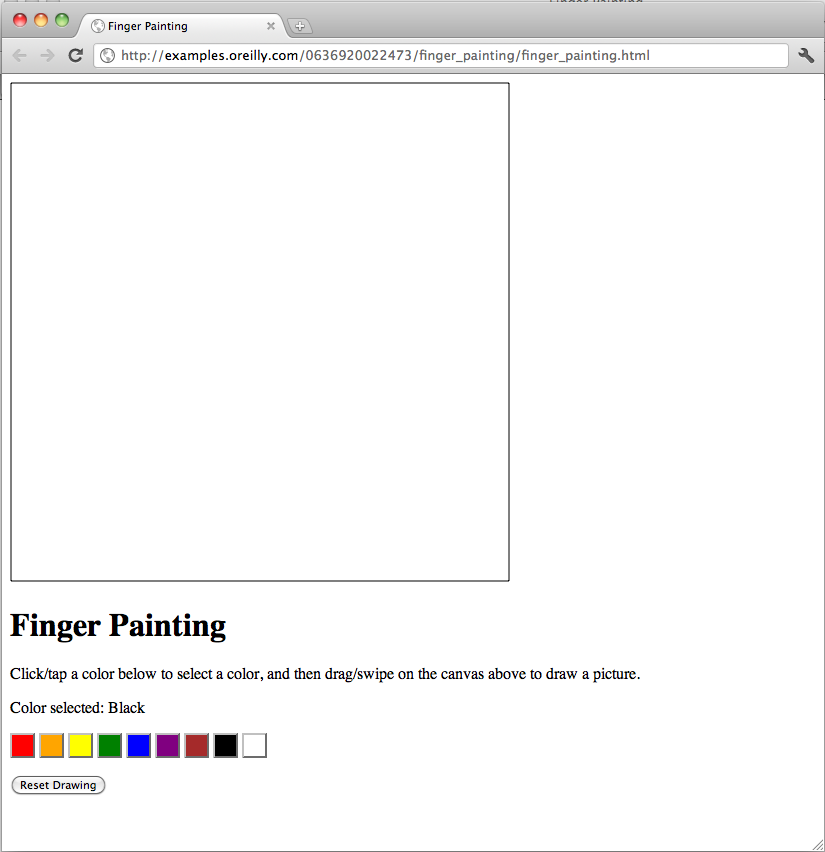
Finger painting interface in Google Chrome (click to enlarge).
In order for the user to be able to draw on the screen, we’ll need
to be able to track his cursor motions and clicks within the Canvas. We
can do so by adding event listeners to the <canvas> element as follows:
theCanvas.addEventListener('mousedown', mouse_pressed_down, false);
theCanvas.addEventListener('mousemove', mouse_moved, false);
theCanvas.addEventListener('mouseup', mouse_released, false);
Now when a user presses down on the mouse within the
<canvas>, a mousemove event is
triggered in the browser, and our event listener calls the
mouse_pressed_down function. Similarly, when the mouse
is moved within the dimensions of the Canvas, the
mouse_moved function is called, and when the mouse
button is released, the mouse_released function is
called. Let’s take a look at these three functions:
    function mouse_pressed_down (ev) {
    begin_drawing = true;
    context.fillStyle = colorChosen.innerHTML;
}

function mouse_moved (ev) {
    var x, y;
    // Get the mouse position in the canvas
    x = ev.pageX;
    y = ev.pageY;

    if (begin_drawing) {
        context.beginPath();
        context.arc(x, y, 7, (Math.PI/180)*0, (Math.PI/180)*360, false);
        context.fill();
        context.closePath();
    }
}

function mouse_released (ev) {
   begin_drawing = false;
}
The mouse_pressed_down function serves to “turn
on” a drawing event on the canvas. It sets the variable
begin_drawing to true, and then sets
the fill color to be used to the current color selected from the color
palette.
Then when the mouse_moved function is called
(which occurs any time the mouse is moved somewhere within the Canvas), we
get the cursor’s coordinates using the
pageX/pageY properties. We check if
the begin_drawing variable is set to
true, which means that the user has the mouse button
pressed down, and if so, we draw a circle of the designated color with a
radius of 7 pixels at the cursor location.
As long as the mouse button is held down while the mouse is moved
over the Canvas, the mouse_moved function will be
called every single time the cursor location changes, which means that
circles will continue to be drawn as the mouse moves, resulting in an
effect quite similar to the Paintbrush tool in many image-editing
applications.
When the mouse button is released, the
begin_drawing variable is set back to
false, which “turns off” the drawing event. This
ensures that drawing occurs only when the mouse is held down, and not when
the mouse is moved over the Canvas without the button being
pressed.
The above code works great on desktop and laptop browsers, where a
mouse is used to interface with screen elements, but what about
touchscreen devices like the iPad? In general, touchscreen browsers do not
support
mousedown/mousemove/mouseup
events, as there is no mouse button or mouse cursor that they can track;
all those features are replaced with finger taps and swipes. However,
WebKit-based browsers support
a corresponding set of events for tracking finger motions in the browser:
touchstart/touchend/touchmove.
So we can implement the same drawing functionality as above using a
touchmove event listener:
theCanvas.addEventListener('touchmove', touch_move_gesture, false);
And the following touch_move_gesture
function:
function touch_move_gesture (ev) {
    // For touchscreen browsers/readers that support touchmove
    var x, y;
    context.beginPath();
    context.fillStyle = colorChosen.innerHTML;
    if(ev.touches.length == 1){
        var touch = ev.touches[0];
        x = touch.pageX;
        y = touch.pageY;
        context.arc(x, y, 7, (Math.PI/180)*0, (Math.PI/180)*360, false);
        context.fill();
    }
}
(Note: The touchmove handling for touchscreen devices
is actually much simpler than the mouse-based version, because we don’t
even need to track touchstart and
touchend events. When dealing with a mouse, we need
to keep track of whether the mouse button is pressed or not when it’s
being moved on the canvas. In the touch version, we know that if the
touchmove event has been triggered, the user has his
finger on the screen and is intending to draw.)
And that’s the meat of the finger painting code. All that’s left is
the code to initialize the event listeners, track color palette
selections, and implement the Reset Drawing button functionality. The example below shows the full JavaScript code for our
finger painting application. (The finger painting JavaScript code can be downloaded here.)
window.addEventListener('load', eventWindowLoaded, false);
function eventWindowLoaded() {
    canvasApp();
}

function canvasSupport () {
    return Modernizr.canvas;
}


function canvasApp(){
    if (!canvasSupport()) {
        return;
    }else{
        var theCanvas = document.getElementById('canvas');
        var context = theCanvas.getContext('2d');
        var redButton = document.getElementById("Red");
        var orangeButton = document.getElementById("Orange");
        var yellowButton = document.getElementById("Yellow");
        var greenButton = document.getElementById("Green");
        var blueButton = document.getElementById("Blue");
        var purpleButton = document.getElementById("Purple");
        var brownButton = document.getElementById("Brown");
        var blackButton = document.getElementById("Black");
        var whiteButton = document.getElementById("White");
        var colorChosen = document.getElementById("color_chosen");
        var resetButton = document.getElementById("reset_image");
        redButton.addEventListener('click', colorPressed, false);
        orangeButton.addEventListener('click', colorPressed, false);
        yellowButton.addEventListener('click', colorPressed, false);
        greenButton.addEventListener('click', colorPressed, false);
        blueButton.addEventListener('click', colorPressed, false);
        purpleButton.addEventListener('click', colorPressed, false);
        brownButton.addEventListener('click', colorPressed, false);
        blackButton.addEventListener('click', colorPressed, false);
        whiteButton.addEventListener('click', colorPressed, false);
        resetButton.addEventListener('click', resetPressed, false);
        drawScreen();
    }

    function drawScreen() {
        theCanvas.addEventListener('mousedown', mouse_pressed_down, false);
        theCanvas.addEventListener('mousemove', mouse_moved, false);
        theCanvas.addEventListener('mouseup', mouse_released, false);
        theCanvas.addEventListener('touchmove', touch_move_gesture, false);
        context.fillStyle = 'white';
        context.fillRect(0, 0, theCanvas.width, theCanvas.height);
        context.strokeStyle = '#000000';
        context.strokeRect(1,  1, theCanvas.width-2, theCanvas.height-2);
    }

    // For the mouse_moved event handler.
    var begin_drawing = false;

    function mouse_pressed_down (ev) {
        begin_drawing = true;
        context.fillStyle = colorChosen.innerHTML;
    }

    function mouse_moved (ev) {
        var x, y;
        // Get the mouse position in the canvas
        x = ev.pageX;
        y = ev.pageY;

        if (begin_drawing) {
            context.beginPath();
            context.arc(x, y, 7, (Math.PI/180)*0, (Math.PI/180)*360, false);
            context.fill();
            context.closePath();
        }
    }

    function mouse_released (ev) {
        begin_drawing = false;
    }

    function touch_move_gesture (ev) {
        // For touchscreen browsers/readers that support touchmove
        var x, y;
        context.beginPath();
        context.fillStyle = colorChosen.innerHTML;
        if(ev.touches.length == 1){
            var touch = ev.touches[0];
            x = touch.pageX;
            y = touch.pageY;
            context.arc(x, y, 7, (Math.PI/180)*0, (Math.PI/180)*360, false);
            context.fill();
        }
    }

    function colorPressed(e) {
        var color_button_selected = e.target;
        var color_id = color_button_selected.getAttribute('id');
        colorChosen.innerHTML = color_id;
    }

    function resetPressed(e) {
        theCanvas.width = theCanvas.width; // Reset grid
        drawScreen();
    }
}
You can experiment with the Finger Painting app on examples.oreilly.com. The image below shows a completed drawing in the Finger Painting app in the iBooks reader for iPad.
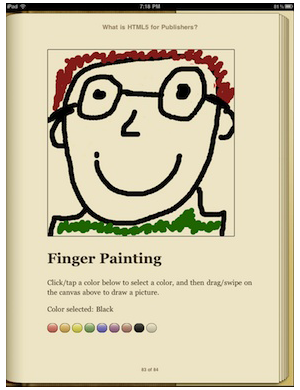
Author self-portrait in Finger Painting app in iBook.
Pretty cool, right? Although maybe not as impressive as what you can do in some other touchscreen finger painting apps.
 HTML5 for Publishers — This free ebook provides an overview of some of the most exciting features HTML5 provides to ebook content creators — audio/video, geolocation, and the Canvas — and shows how to put them in action.
Related:
- HTML5 for publishers (free ebook)
- What is HTML5?